Browser-Based IDEs (JupyterLab, VS Code, RStudio)
AI Platform has adopted Kubeflow for notebook server capability. A notebook server is a full-fledged compute environment configured and based on a Docker image (custom or standard) with JupyterLab, VS Code, or RStudio as the integrated development environment (IDE).
Why use a Kubeflow Notebook Server
This feature brings unique advantages to users:
- Scalable Compute - Allows you to set scale your compute setup according to your needs. Scalable compute includes items such as CPU (0.5 CPU, 1 CPU, 2 or more CPU etc.), GPU, and RAM (1 GB, 2 GB, 4 or more GB). It makes it easier to scale up compute instance resources by creating a new notebook server when the need arises.
- Virtual Environment Automation - Allows you to setup project/team specific custom images with all dependencies included. This way, whenever someone spins up a new notebook server using the image, the virtual environment is already pre-created in the notebook. This bypasses the need to setup the environment from scratch for new users on the project or whenever a new notebook server is set up.
- Recover Corrupted Environment - During experimentation and development, sometimes Python/Linux virtual environments become corrupted due to inadvertent installation of undesired new packages. With a Kubeflow Notebook Server, it becomes easier to recover the environment (as setup in the Docker image) by simply stopping and starting the notebook server.
- Multi-user Isolation - You can create notebooks, volumes, experiments, TensorBoards, or deployments within your own private namespace, which is accessible only to you. For collaborative work, you can generate project-specific resources within a shared team or project namespace, making them accessible to other team members.
Due to these unique advantages, the AI Platform team recommends that you use Kubeflow Notebook Servers during the development and experimentation stages when you need an IDE (JupyterLab, VS Code, RStudio).
While we mainly work with JupyterLab or VS Code, we also support RStudio notebooks.
How to create a Kubeflow Notebook Server
Prepare Docker image
Kubeflow offers the ability to create and manage custom containerized Docker images that serve as notebook server environments.
These images can be pre-configured with project dependencies along with the necessary packages, drivers, and development environments like JupyterLab or VS Code. This allows users to version control their environments by maintaining different versions of their project environments.
This feature speeds up the application development by enabling users to quickly set up their environments as their project compute needs keep changing during the project. For switching to different notebook servers with new compute specs, a new notebook server with the same image can be created with the desired CPU, GPU, RAM, and memory resources. This feature eliminates the need to create virtual environments each time the compute instance changes.
In case the virtual environment within the notebook server gets corrupted, the clean environment can be recovered by simply stopping and restarting the notebook. New packages can also be installed on top of the existing virtual environments within the JupyterLab environment by using Python pip or conda commands.
Before creating your notebook, decide whether you need just a general-purpose notebook image or if you need something more specific for your project.
- AI Platform provides its own custom, general-purpose images that you can use for JupyterLabs, VS Code, and RStudio. Contact the AI Platform team for more information about the available notebook images.
- If you need something more specific for your project, see details below in How to create a custom Docker image.
How to create a custom Docker image
To create a notebook Docker image with your requirements pre-installed, follow these steps:
-
Make sure you have the
Aurora Developerrole (see Getting Started). This is required to push the created image into the Azure Container Registryauroradevacr.noteIf you require to push the created image very often, it is suggested to have the image build and push processes incorporated into your build system (Equinor recommends GitHub actions).
-
From a terminal, log in to Azure CLI to load the latest subscription:
az login -
Use Azure CLI to point to the Aurora non-production subscription,
019958ea-fe2c-4e14-bbd9-0d2db8ed7cfc:az account set -s 019958ea-fe2c-4e14-bbd9-0d2db8ed7cfc -
Check that you're using the Aurora non-production subscription.
- In the terminal, run the show account command:
az account show- You should receive a response similar to this one:
{
  "environmentName": "AzureCloud",
  "homeTenantId": "3aa4a235-b6e2-48d5-9195-7fcf05b459b0",
  "id": "019958ea-fe2c-4e14-bbd9-0d2db8ed7cfc",
  "isDefault": true,
  "managedByTenants": [
    {
      "tenantId": "2f4a9838-26b7-47ee-be60-ccc1fdec5953"
    }
  ],
  "name": "S913-Aurora-Non-production",
  "state": "Enabled",
  "tenantId": "3aa4a235-b6e2-48d5-9195-7fcf05b459b0",
  "user": {
    "name": "HAIJ@equinor.com",
    "type": "user"
  }
} -
To log in to the
auroradevacrAzure Container Registry, run:az acr login --name auroradevacr -
Use the following Docker image template.
- Update the base image to use one of the public images in Kubeflow (GPU or CPU)
- Set the dependencies you wish to install.
# TODO start with one of the available kubeflow public images
# Make sure you are using CPU or GPU depending on your need
# Example for GPU Tensorflow
# FROM gcr.io/kubeflow-images-public/tensorflow-2.1.0-notebook-gpu:1.0.0
# Or example for CPU
# FROM gcr.io/kubeflow-images-public/tensorflow-2.1.0-notebook-cpu:1.0.0
ARG NB_USER=jovyan
ENV NB_PREFIX /

USER root
# TODO Add your dependencies install here
# Example
# RUN pip3 install torch torchvision
# RUN pip3 install skorch
# RUN pip3 install seaborn graphviz
# RUN pip3 install tensorflow-probability
# RUN pip3 install tensorflow-estimator==2.1.0
# RUN pip3 install pydot

# Create NB_USER user with UID=1000 and in the 'users' group
# but allow for non-initial launches of the notebook to have
# $HOME provided by the contents of a PV
RUN  chown -R ${NB_USER}:users /usr/local/bin

# Configure container startup
EXPOSE 8888
USER jovyan
ENTRYPOINT ["tini", "--"]
CMD ["sh","-c", "jupyter notebook --notebook-dir=/home/${NB_USER} --ip=0.0.0.0 --no-browser --allow-root --port=8888 --NotebookApp.token='' --NotebookApp.password='' --NotebookApp.allow_origin='*' --NotebookApp.base_url=${NB_PREFIX}"] -
Build your Docker image with the
auroradevacdomain name. ReplaceMY_PROJECTwith the appropriate project name:docker build -t auroradevacr.azurecr.io/MY_PROJECT/project-notebook:v1.0.0 -
Push the Docker image to the
auroradevacrrepository. ReplaceMY_PROJECTwith the appropriate project name:docker push auroradevacr.azurecr.io/MY_PROJECT/project-notebook:v1.0.0
Prepare data volume
Before creating a notebook, ensure that you have a data volume to attach to it.
We recommend that you use a persistent storage volume, as this can be recovered within your cluster should your notebook fail (as long as you keep the same notebook server name). The persistent storage volume can be migrated to a new cluster when the AI Platform team moves or updates the cluster.
You can use either a personal or shared persistent storage volume for your notebook:
- If you need a personal volume for your notebook, the you should create a
ReadWriteManypersistent volume by following the instructions below: How to set up a personal volume - If you are going to attach an existing shared volume to your notebook, go to How to set up a shared volume below.
How to set up a personal volume
To create a ReadWriteMany persistent volume, follow these steps:
-
Open the Kubeflow Central Dashboard and select a namespace to work on.
-
Click Volumes in the side panel.
-
Click + New Volume
-
In the New Volume settings, select the following parameters:
- Name: enter any name
- Volume size in Gi:
10(or as needed) - Storage Class:
standard - AccessMode:
ReadWriteMany
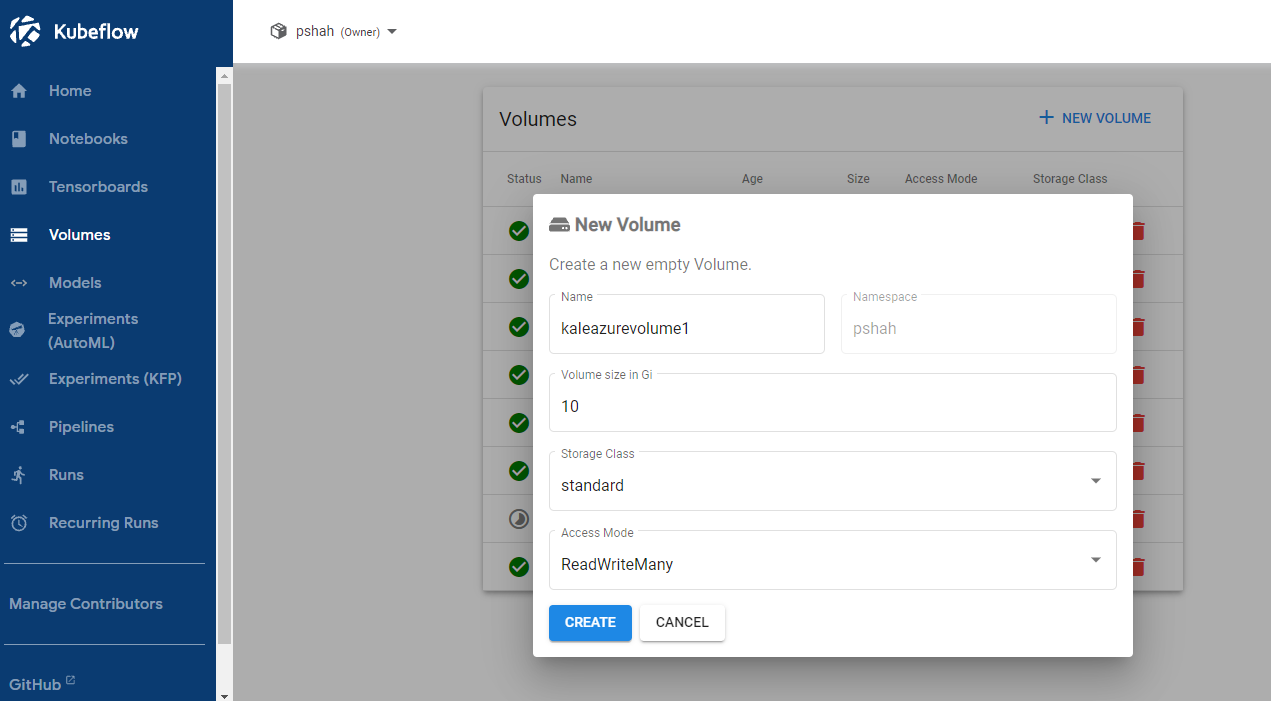 New volume settings
- Click Create.
- After creating the volume, proceed to create your notebook.
How to set up a shared volume
First steps
Before starting to set up the volume, contact the AI Platform team and ask them to provision the necessary resources and configure them in the Azure subscription. You must supply them with the following information:
- Name of the project. For example,
Deli. - List of the full usernames or Azure Active Directory Group that should have access to the storage. For example:
haij@equinor.com,clbi@equinor.com,etim@equinor.comorAurora Developers. - If you own an AI Platform cluster, please supply the name of the cluster or public endpoint. For example:
deli12, ordeli.dev.aurora.equinor.com. If you do not have a working cluster yet, one will be provisioned for you.
- These steps only need to be carried out once. All new AI Platform clusters for this project will use the same configuration.
- For each user present in the provided list or Azure Active Directory Group, a Kubeflow profile will be created in the AI Platform cluster (See the page on multi-user isolation for more information about namespaces/profiles).
Best practices
- Teams should setup "shared-data-volume" (with "standard" storage type and "ReadWriteMany" access) under their shared project profile. This volume can be then mounted with multiple notebook servers by multiple people so that stored data can be shared among the team.
- On the shared data volume, create two folders:
codeanddata.- Under the
codefolder, create folders with each team member's Equinor short name. This is where each member can clone their GitHub repos and work on their own code once they mount the volume with their own notebook servers. - Shared team data can be stored under
datafolder. The directory structure can be determined by the team based on their needs.
- Under the
Next step
After ensuring you have everything to attach a shared volume, proceed to create your notebook in the next section of this tutorial.
Create your notebook
This section covers general first steps on how to set up a Kubeflow Notebook Server when working with the Aurora platform.
-
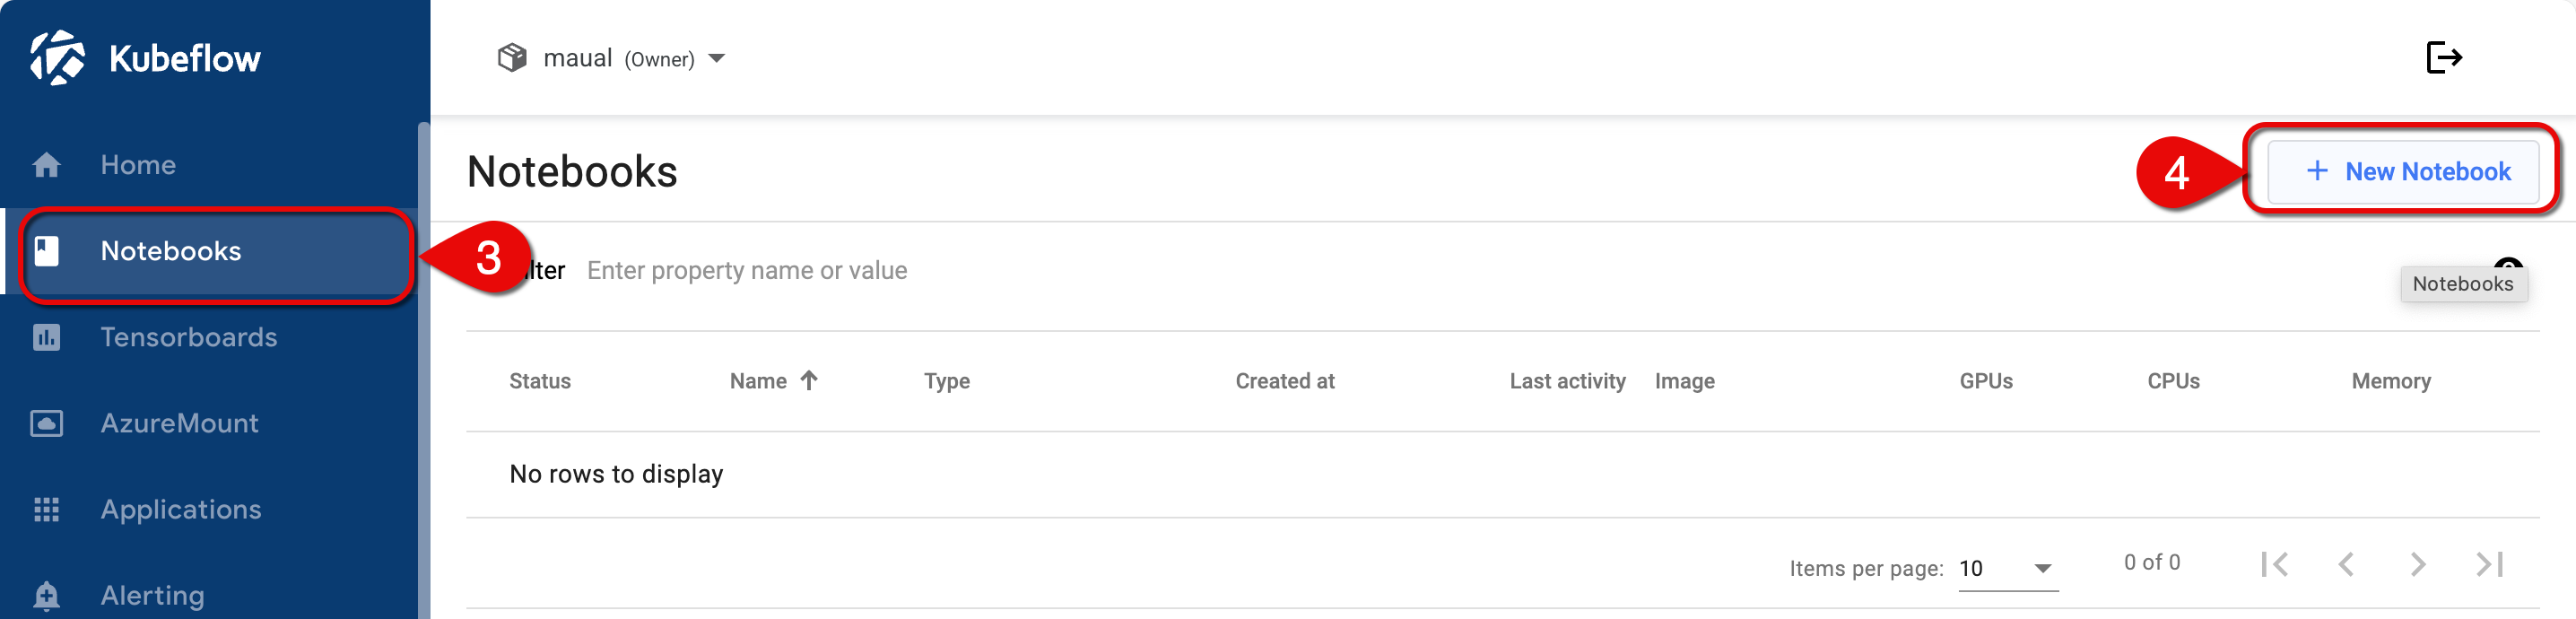
Open the Kubeflow Central Dashboard.
-
From the namespace dropdown menu in the top navigation bar, chose the namespace that you want to create the notebook server on.
 Namespace dropdown menuinfo
With your access you should have been provided with a Kubeflow namespace. The namespace is your Equinor shortname or Azure Directory (AD) username. You should have access to your own and other namespaces you have been given access to from individuals or projects.
If you don't see the proper namespace, contact the AI Platform team.
-
Click Notebooks on the side panel.
-
Click + New Notebook to open the notebook settings form.
 Namespace dropdown menu
 -
Set Name.
- The notebook name should include your username to identify whom it belongs.
- The name can include letters and numbers, but no spaces.
- Example:
pshah-cpu
-
Choose an IDE (JupyterLab, VS Code, or RStudio).
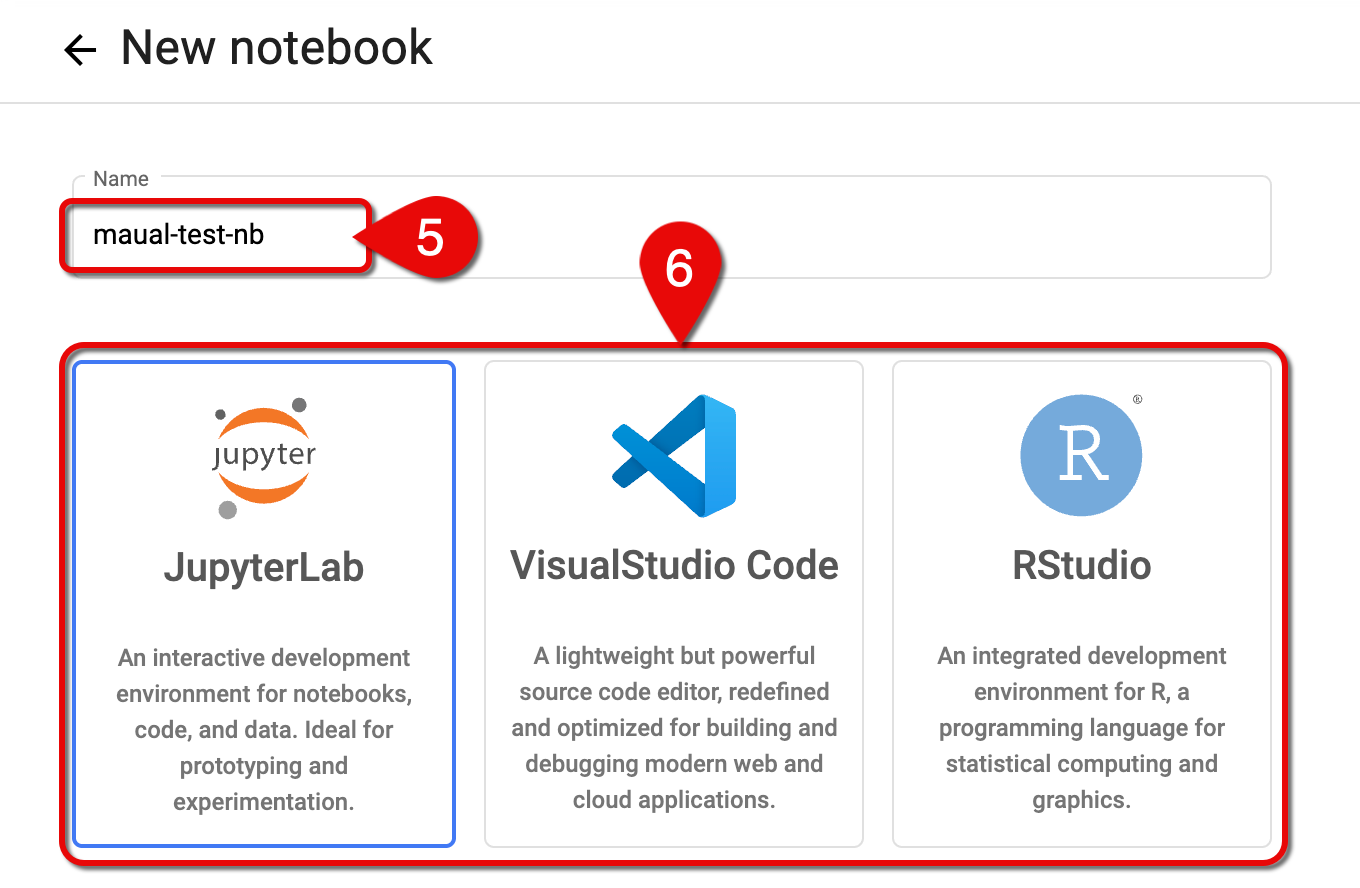 Notebook name and available notebook types
Custom Notebook
You can chose to either:
Use AI Platform custom images
Users or teams without project-specific Docker images are encouraged to start with one of the general-purpose Docker images provided by AI Platform. These notebook images include root access and come pre-configured with the corresponding environment for interactive development.
To set a general-purpose image provided by AI Platform:
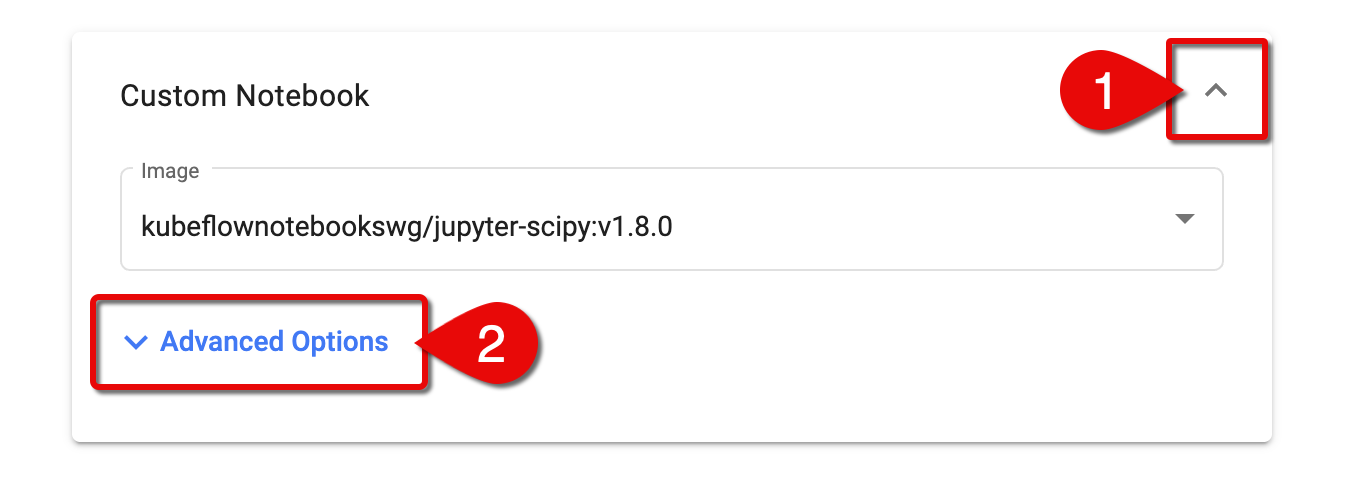
-
Click the arrow to expand the Custom Notebook section.
-
In the Image dropdown menu, select an image corresponding to the IDE you chose.
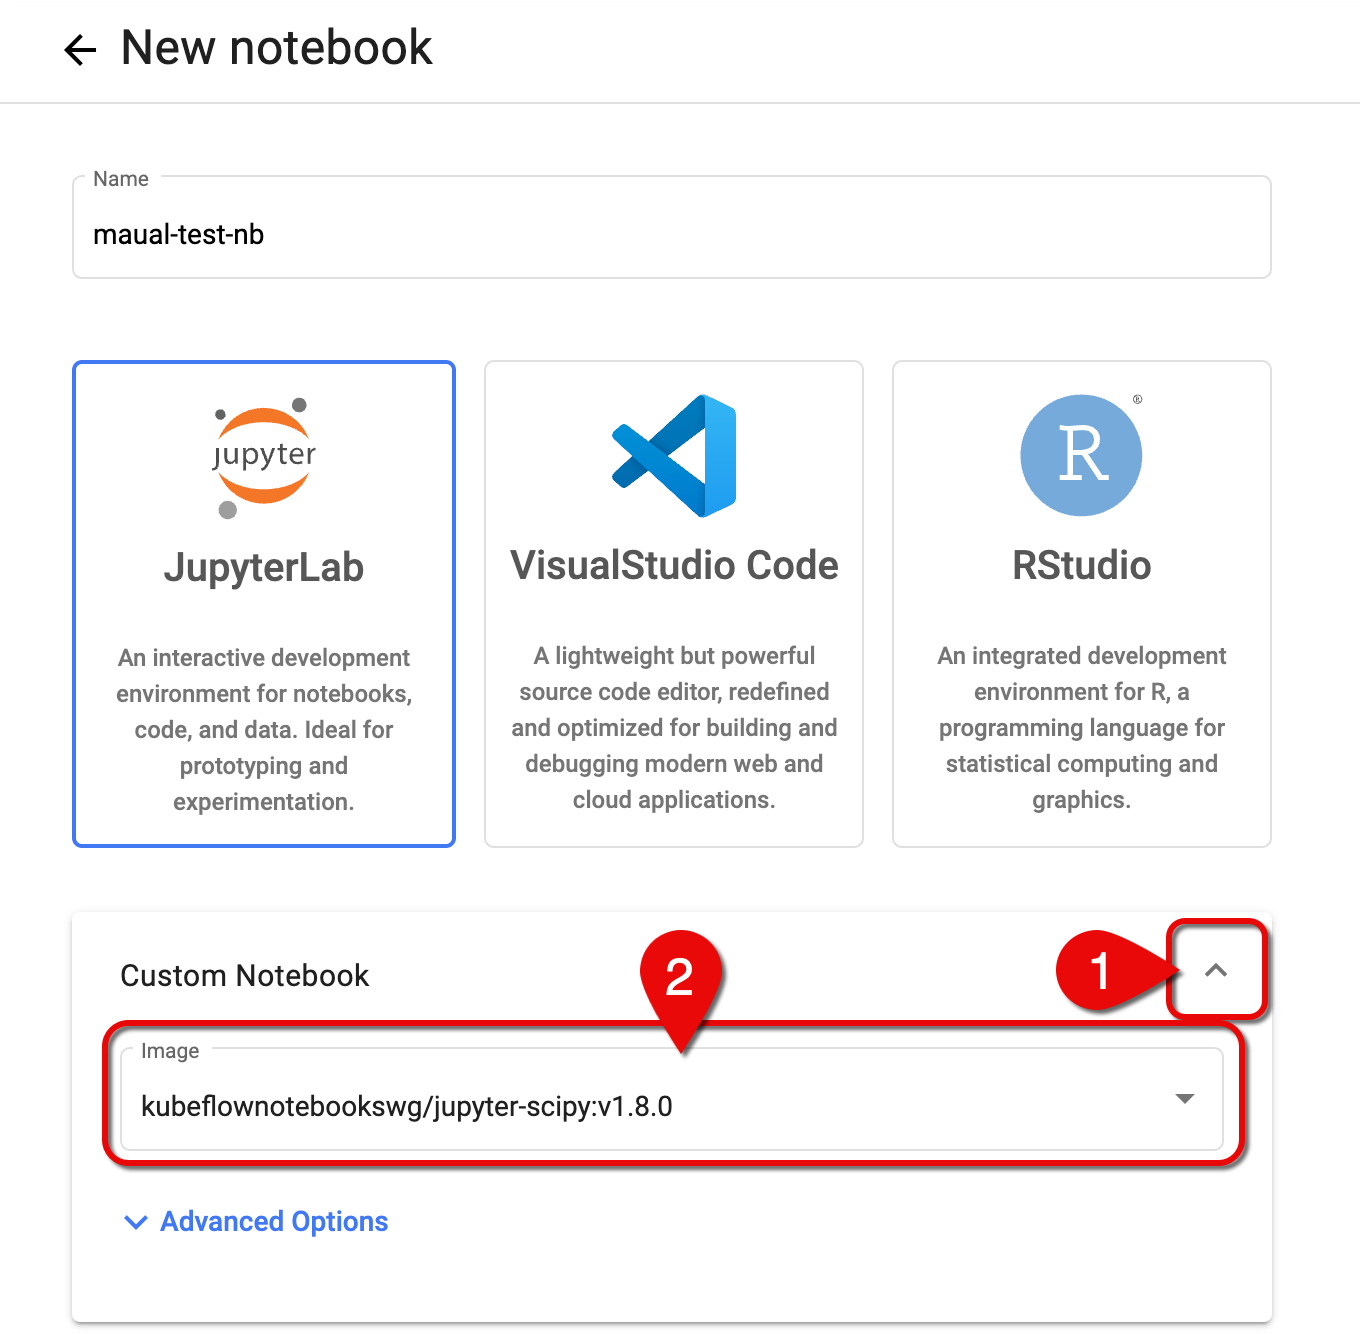 Set notebook image
IDE Notebook image Description JupyterLab kubeflownotebookswg/jupyter-scipy:v1.8.0JupyterLab + Common Packages JupyterLab kubeflownotebookswg/jupyter-pytorch-full:v1.8.0JupyterLab + PyTorch + Common Packages JupyterLab kubeflownotebookswg/jupyter-pytorch-cuda-full:v1.8.0JupyterLab + PyTorch + CUDA + Common Packages JupyterLab kubeflownotebookswg/jupyter-tensorflow-full:v1.8.0JupyterLab + TensorFlow + Common Packages JupyterLab kubeflownotebookswg/jupyter-tensorflow-cuda-full:v1.8.0JupyterLab + TensorFlow + CUDA + Common Packages VS Code kubeflownotebookswg/codeserver-python:v1.8.0code-server + Conda Python RStudio kubeflownotebookswg/rstudio-tidyverse:v1.8.0RStudio + Tidyverse
Use your own custom Docker image
You can use a custom Docker image as long as it's present in auroradevacr, the Aurora Azure Container Registry, and has the same entrypoint.
To create your own custom Docker image, refer to the How to create a custom Docker image instructions, in the Prepare Docker image
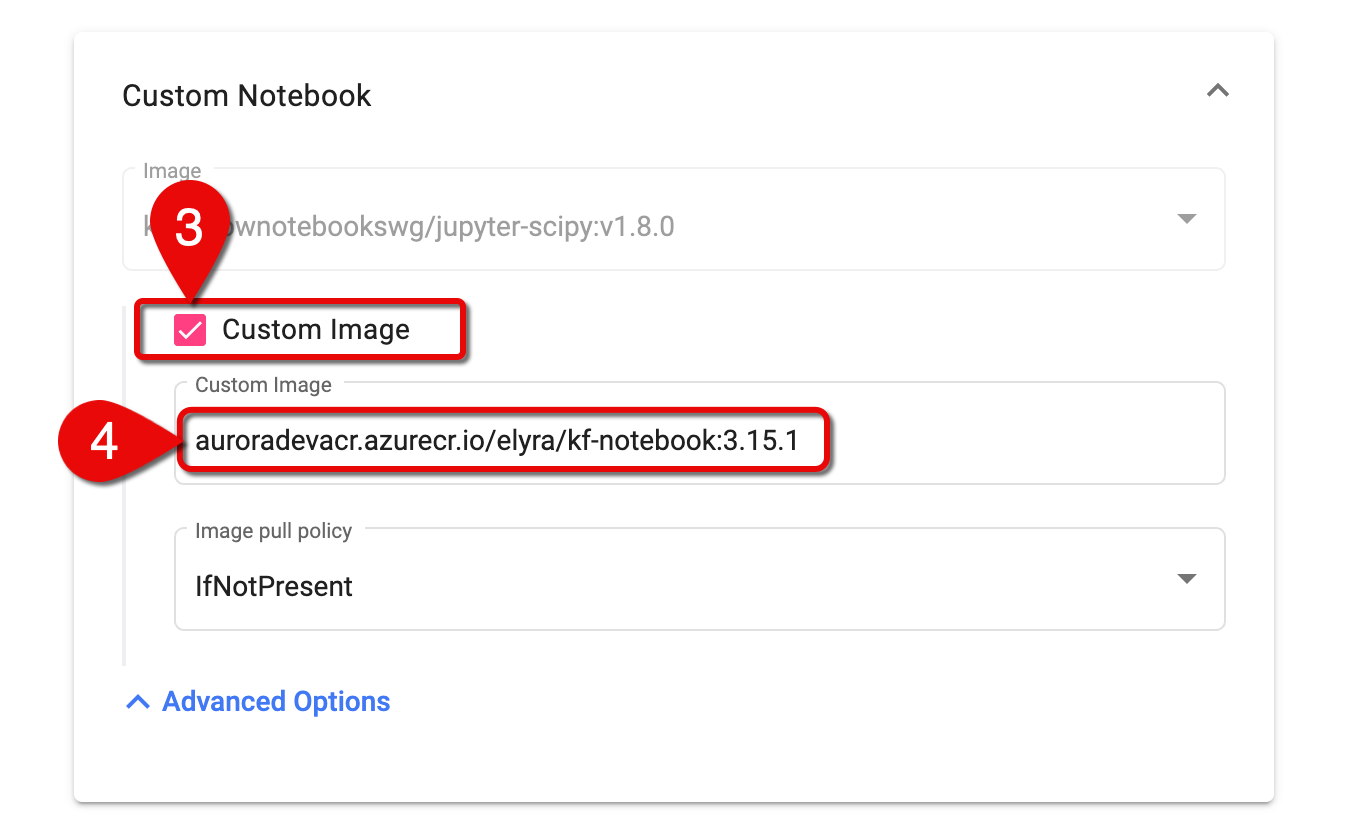
To set your custom image:
-
Click the arrow to expand the Custom Notebook section.
-
Click Advanced Options to further expand the section.
 Expand custom notebook settings
 -
Select the Custom Image checkbox.
-
In the Custom Image field, enter the Docker image, using the following naming convention:
registry/image:tag. For example,auroradevacr.azurecr.io/elyra/kf-notebook:3.15.1
 Enter a custom Docker image
CPU/RAM
- Go to the CPU/RAM section.
- Fill out the CPU and Memory fields.
Consult with the AI Platform team if needed.
GPU
You can use GPU for Jupyter Notebook Server compute if your use case needs it. See below for details on How to spin up a notebook server with GPU.
If you are not going to use GPU, make sure you set the Number of GPUs option to None.
- High Cost & Resource Constraints: GPU nodes are significantly more expensive than CPU nodes and, due to technical limitations, cannot be shared across notebook servers (i.e., one notebook server = one dedicated GPU node). All GPU nodes are provisioned and managed manually.
- Usage Optimization: To control costs and free up resources, we strongly recommend stopping your notebook server when GPU resources are not actively needed — especially overnights and weekends.
- Availability Limitations: If your workload requires a GPU and your notebook server fails to start after correctly setting GPU configuration, it likely means that no GPU nodes are currently available. Contact the AI Platform team for assistance.
- For GPU usage, teams are advised to setup a common
shared-gpunotebook server that can be used as and when needed by all members. Teams should be mindful of the high cost of GPUs and should stop notebook servers when not in use. This GPU notebook will also haveshared-data-volumemounted to it to seamlessly share data among various notebooks. - It is recommended that users do most of their development work on CPU notebooks and use GPU only when they need to run training/computations on GPU.
How to spin up a notebook server with GPU
To run the notebook server on a GPU node, follow these steps:
-
Go to the GPUs section.
-
Set the values of following fields:
- Number of GPUs:
1 - GPU Vendor:
NVIDIA
 GPU settings
 - Number of GPUs:
-
In the Affinities/Tolerations section, choose a GPU node from the NC series from the Tolerations Config dropdown menu.
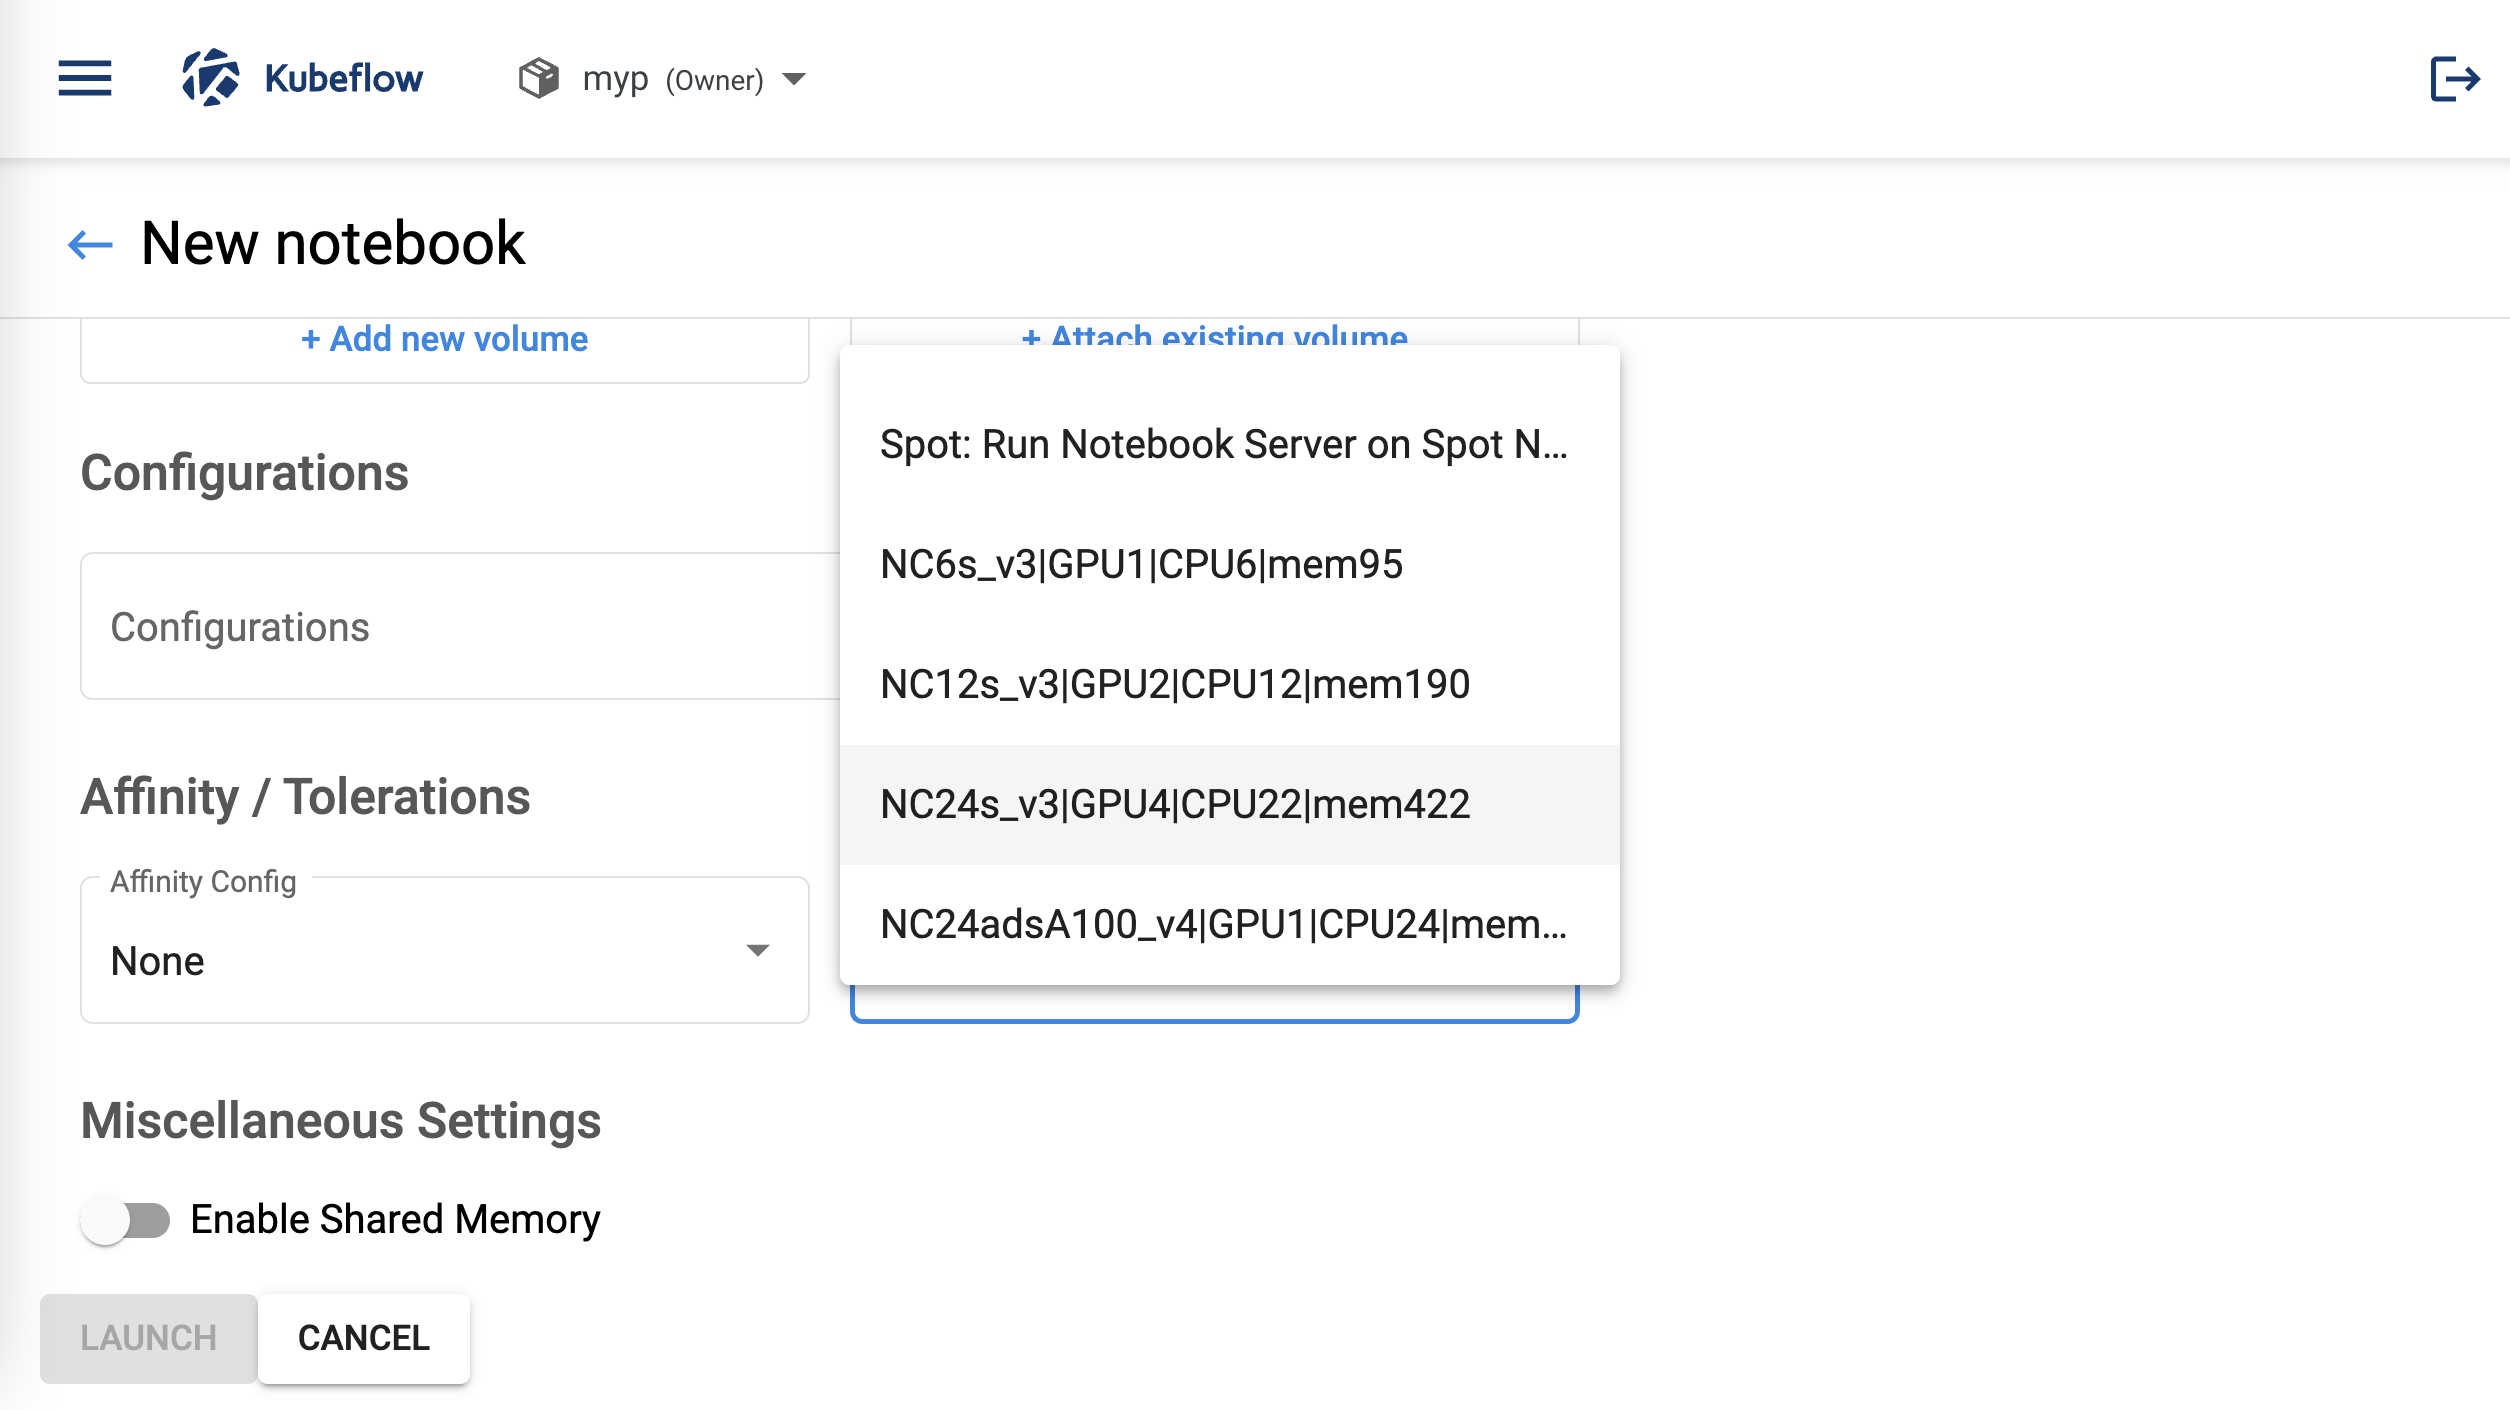 Tolerations settingsAvailable GPU nodes from NC series
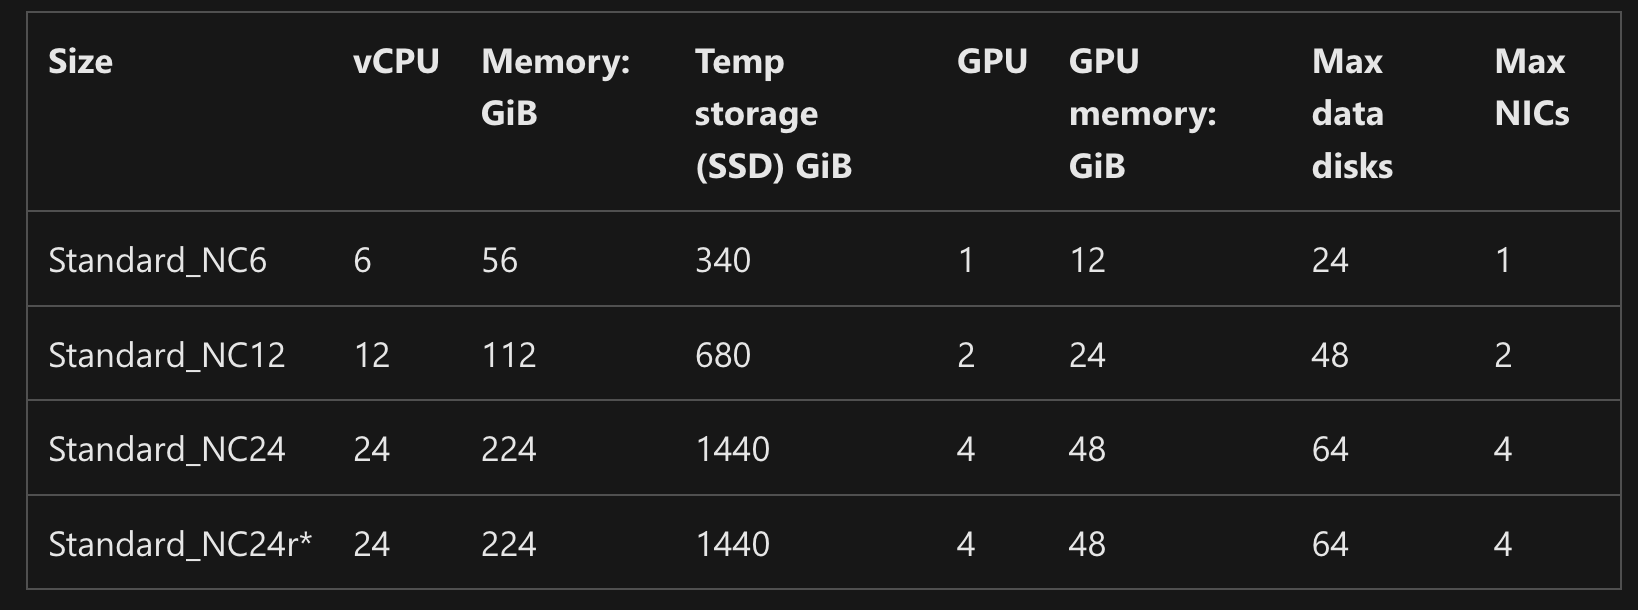
- When you request a powerful GPU node (for example, NC_24), a large portion of that node’s total memory (about 85%) is reserved and not directly usable by your workload. In the case of NC_24, which has around 224 GB of memory, about 195 GB is pre-allocated for system and overhead processes, leaving only a small portion of memory available to your actual notebook or ML workload.
- For more information, go to Microsoft's Azure documentation: NC sizes series
Example of running on a PyTorchJob GPU node:
apiVersion: kubeflow.org/v1
kind: PyTorchJob
metadata:
  name: jobmyptest
  namespace: <SET YOUR OWN/OR SHARED KUBERNETES NAMESPACE>
spec:
  pytorchReplicaSpecs:
    Master:
      replicas: 1
      template:
        metadata:
          labels:
            WBS: <SET YOUR PROJECT WBS>
        spec:
          containers:
            - command: ["/bin/sh", "-c"]
              args:
              - >
                cd /models/pipeline_inspection/workdir &&
                jupyter notebook --allow-root --NotebookApp.token='' --NotebookApp.password='' &
                code-server --auth none
                wait
              image: 'auroradevacr.azurecr.io/kai-bertmate:1.6'
              imagePullPolicy: Always
              name: pytorch
              resources:
                requests:
                  memory: 0
                  nvidia.com/gpu: 1
                limits:
                  memory: 195Gi
                  nvidia.com/gpu: 1
              volumeMounts:
                - mountPath: /dev/shm
                  name: dshm
              ports:
              - name: primary
                containerPort: 8888
          nodeSelector:
            agentpool: gpua1001
          tolerations:
            - effect: NoSchedule
              key: nvidia.com/gpu_a100_1
              operator: Equal
              value: present
          volumes:
            - emptyDir:
                medium: Memory
              name: dshm
Workspace volume
When creating a new notebook Server, let it automatically create a default workspace volume for storing notebook-specific data.
To set up the volume to be mounted as your personal workspace:
-
Go to the Workspace Volume section.
-
Click the arrow to expand the New volume panel.
-
Set fields correspondingly.
 Workspace volume settings
Data volumes
As discussed in the Prepare data volume section, you should have either a personal or shared volume ready to attach to your notebook server.
- In the Data Volumes section, click + Add existing volume.
- Click the arrow on Existing volume to expand the panel.
- In the Name dropdown menu, choose the volume you have prepared.
- En sure Mount point is correct.
Configurations
- Go to the Configurations section.
- Select all the checkboxes.
This will enable access between modules including Kale and Elyra.
 Configurations settings
Spot Node
For quick-running or non-persistent workloads, you could optionally use Spot Nodes.
Spot Nodes are identical to regular Nodes but come at a much lower price. This is due to the fact that they can be evicted at any time.
How to set up a Spot Node
To set the notebook server configuration to run on Spot Node, set the following:
-
In the Affinity section, choose one of the
Spotconfigurations from the dropdown menu. Affinity config set to Spot Node
 -
In the Tolerations section, choose
Spot: Run Notebook Server on Spot Nodefrom the dropdown menu. Tolerance group set to Spot Node
Launch notebook
- Go to the bottom of the notebook settings page.
- Click Launch.
 Ready to launch
- After a few minutes, your notebook should be up and running.
 Notebook is being created
 Notebook is ready
How to link your notebook to a GitHub repository
We recommend you regularly backup your notebook to a GitHub repository.
To backup your notebook in GitHub, follow these steps:
- Create a GitHub token. Go to GitHub's Managing your personal access tokens for details.
- Obtain your repository's URL (HTTPS, not SSH).
note
Go to GitHub's Cloning a repository for more details.
- Start a shell terminal from your notebook.
- Type the
git clonecommand, paste the URL you copied earlier, and press Enter.git clone https://github.com/equinor/YOUR-REPO.git. - Add your git username when asked and put the GitHub personal access token you obtained earlier when asked for the password.